This page lets you configure the main toolbar. For more information on the main toolbar bar see the Toolbars section.
The main toolbar configuration is divided into three parts. To move from one to another click on the buttons at the top of the dialog, shown below.
Toolbar sections
In this section you can add or remove tools from the buttons on the toolbar. You can also configure an individual drop down menu for each button if you choose. The image below shows a section of the Add/Remove part of the dialog.
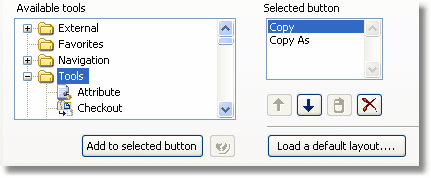
Add/Remove
Step 1: First locate the tool you wish to add to the toolbar in the tree view containing available tools on the left.
Step 2: Next click on the button you want to add the tool to on the toolbar preview in the middle of the dialog. Then click on Add to button beneath the tools tree view on the left. The selected tool should now appear in the list.
If the button was empty before you added the tool the preview should now reflect the change.
You may also have more than one tool assigned to each button. The first tool in the list will appear on the toolbar and will be accessible by a normal left mouse click. All other tools will be on a drop down list unless they are configured as right mouse button tool. To make a tool available with the right mouse button, click on the mouse icon button underneath the selected button list.
How to modify a button
You may move tools up and down the drop down list clicking on the up and down arrows.
Note: A right mouse button tool cannot be the first entry and will automatically revert to a normal button tool if moved to the top.
How to remove a tool
Select it in the Selected button list and click on the delete button.
Appearance
In this section you can customize the general appearance of the main toolbar. All settings in this section apply to the toolbar in general and are not specific to individual buttons. The image below shows the appearance options.
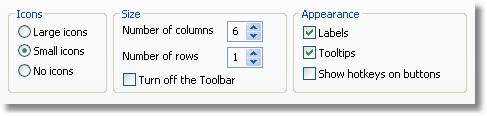
Appearance options
Icons
One of the following icon modes can be selected.
| · | Large icons - Display each tool with a large 24x24 icon on the toolbar
|
| · | Small icons - Display each tool with a small 16x16 icon on the toolbar
|
| · | No Icons - Do not display icons on the toolbar, implies text labels
|
Size
The size of the main toolbar may be set from 4x1 to 16x4. You may also completely remove it by checking Turn off the toolbar.
Appearance
Any of the following options can be selected.
| · | Labels - Displays the name of the tool on the toolbar button
|
| · | Tool tips - Displays the name of the tool when you hold the mouse pointer above the button for a few seconds.
|
| · | Show hotkeys on buttons - Display the keyboard shortcut applicable for the tool in front of its name. E.g. "Ctrl+C Copy".
|
Colors
In this section you can customize the colors of the main toolbar. These settings apply individually to each button. This means you can configure different background and foreground colors to different buttons.

Color options
To change the color of a button follow the following steps.
Step 1: Click on either the foreground or background drop down and select the color you want
Step 2: Click on buttons in the toolbar with the left mouse button to paint the foreground color
Step 3: Click on buttons in the toolbar with the right mouse button to paint the background color